
How to Set Up WhatsApp Automation in GreenTick
Build Workflows That Reply, Follow Up, and Route Chats on Their Own
A customer messages you at 2am - your WhatsApp automation replies instantly, no one on your team has to lift a finger. Here's the exact seven-step flow to build one.
Introduction
Replies and Follow-Ups That Run Without You
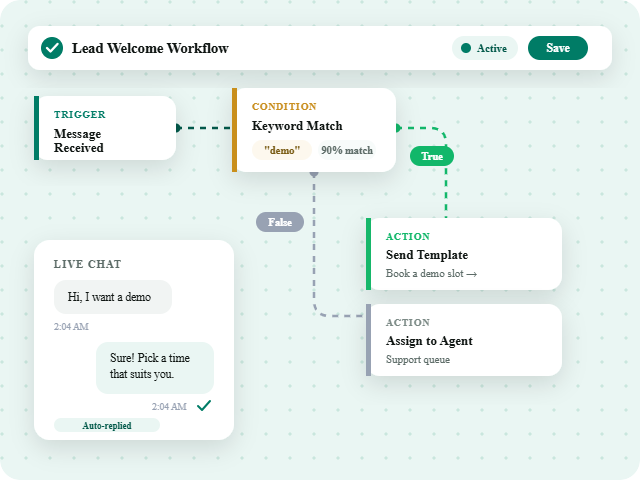
WhatsApp automation lets you build workflows that handle replies, follow-ups, and nurture messaging on their own - no one on your team needs to be online. Think of it as a flowchart: something happens, a condition is checked, and an action fires automatically. Here's the exact flow inside GreenTick's Automations module, from a blank canvas to a live, tested workflow.
Walkthrough
How to Build a WhatsApp Automation
Seven steps, from a blank canvas to a live, tested workflow.
1️⃣ Go to Automations
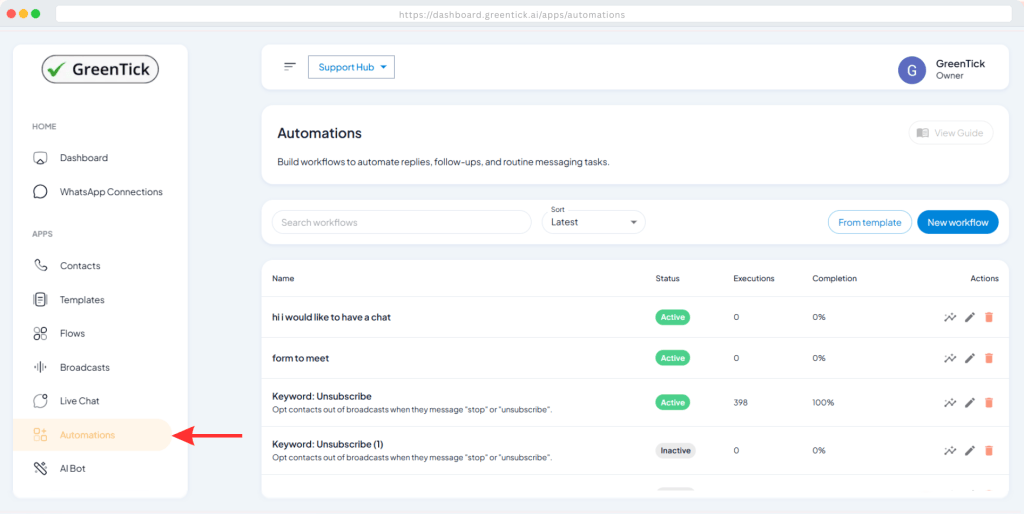
Click Automations in the left panel. Search or sort your existing workflows by Latest, check each one’s Status (Active/Inactive), how many times it’s run, and its completion rate. Edit, view analytics, or delete any workflow from here.
2️⃣ Click New Workflow, name it
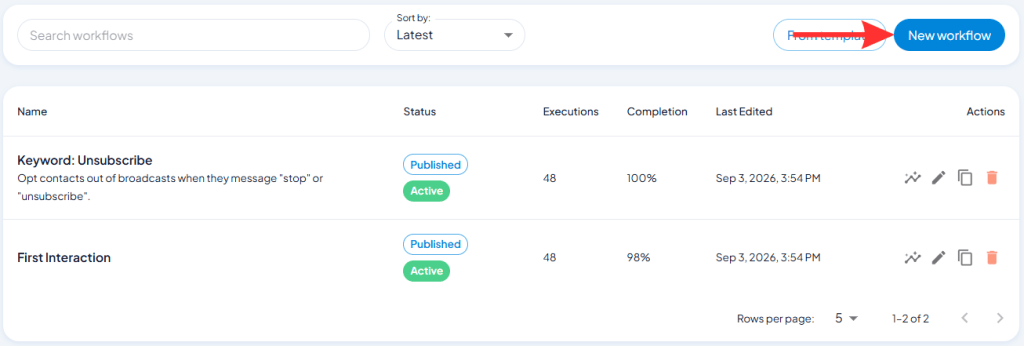
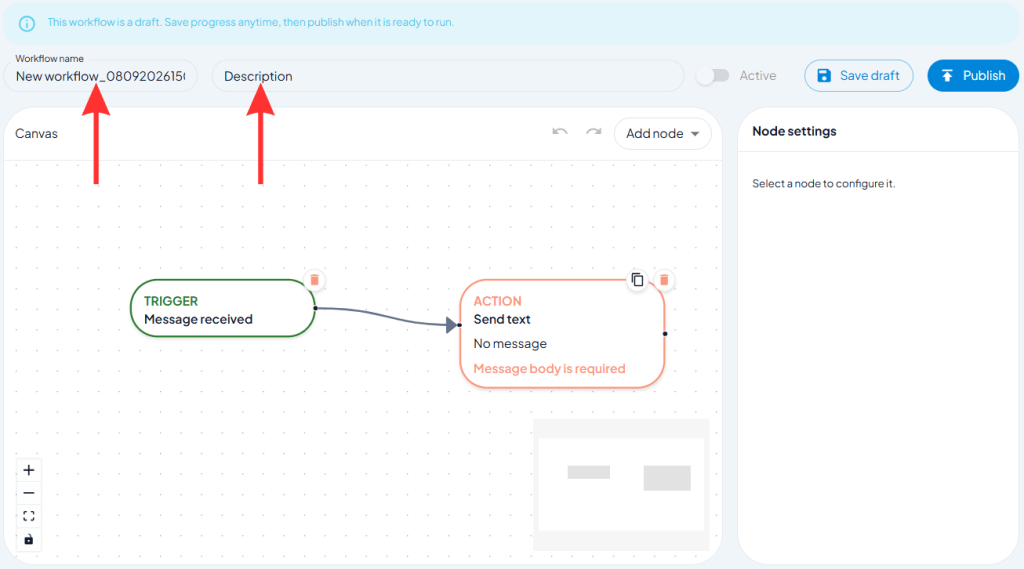
A canvas opens with Node Settings alongside it. Name your workflow so your team can find it easily, and add a description – it’s for internal use only, customers never see it.
3️⃣ Understand the three node types
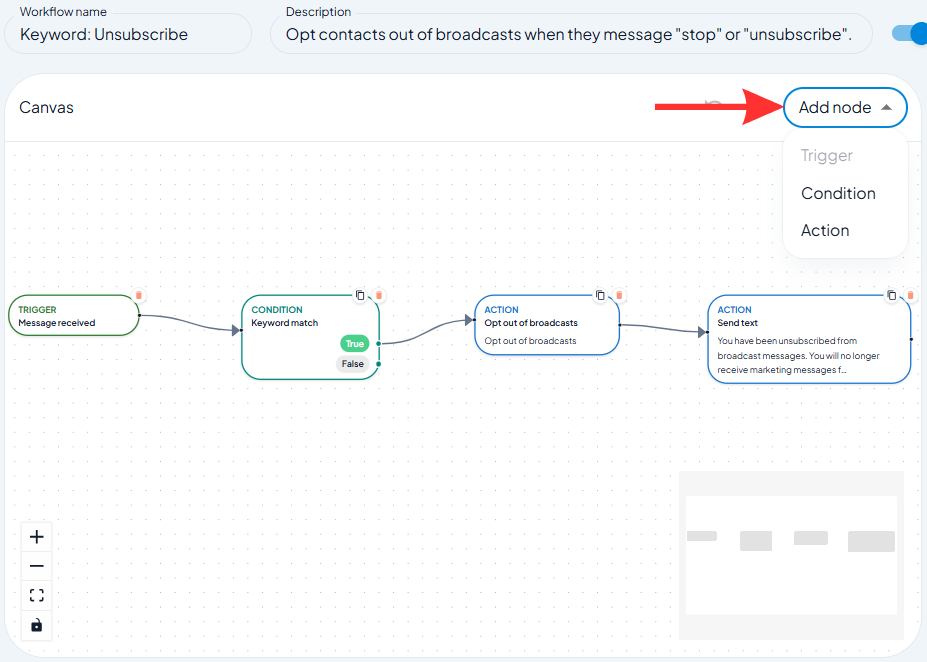
Every automation follows the same pattern: something happens, a condition is checked, an action fires. Click Add Node to see the three options.
Trigger, Condition, and Action Nodes
- Trigger: The starting point. Defines what event kicks off the automation – only one per workflow.
- Condition: The decision point. Checks whether something is true or false, and routes the workflow accordingly.
- Action: Where the output lives – send a message, assign a label, notify an agent, reply with a template.
4️⃣ Add and configure your Trigger
Add a Trigger node – it defaults to Message Received, which runs whenever a customer sends an inbound message. Nothing else to configure here.
5️⃣ Add and configure your Condition
Add a Condition node and pick a type from the dropdown – Keyword Match, First Message, Attribute Equals, Has Label, or Time Window. With Keyword Match, add keywords (e.g. “demo” or “meeting”), set a match percentage (100% requires an exact match, 90% allows for typos or different phrasing), and toggle case sensitivity. Connect it to the Trigger by dragging the small dot on the Trigger node to the Condition node.
6️⃣ Add an Action for True, and one for False
Add an Action node, connect it to the Condition’s True dot, and configure what happens – Send Text, Send Template, Send WhatsApp Flow, Send URL Button, Add or Remove Label, and more. Then add a second Action node connected to the False dot, for when the condition isn’t met.
7️⃣ Activate, save, and test it live
Click the Active toggle, then Save. Head to Live Chat and text your connected number to see it fire in real time – the matching keyword triggers the True action, anything else triggers the False one.
Good to Know
Straight From Meta
Official Documentation
The same 24-hour service window rule applies to automated actions as it does to manual replies. A “Send Text” action only delivers inside that window – outside it, your automation needs to use “Send Template” instead, or the action will fail to send.
Wrapping Up
Start Simple, Then Layer In Conditions
That's a complete WhatsApp automation - trigger, condition, and action, tested live. Start with one simple workflow today, watch it run in Live Chat, then layer in more conditions as you get comfortable with the builder.
FAQs
Frequently Asked Questions
What is WhatsApp automation?
A workflow that handles replies, follow-ups, and routine messaging tasks on its own, without a team member needing to be online. It runs on a trigger, a condition, and an action, defined once and reused automatically.
What's the difference between a Trigger, Condition, and Action node?
A Trigger starts the workflow when something happens, like an inbound message. A Condition checks whether that message meets criteria you set, like a keyword. An Action is what happens as a result, like sending a reply or assigning a label.
Can I use automation templates instead of building from scratch?
Yes. Click “From Template” on the Automations page for pre-built workflows like Away Message, Business Hours, Lead Welcome, and Re-engagement – reconfigure the timing or message, then activate.
Does WhatsApp automation work outside the 24-hour service window?
Only if the action sends an approved template. A “Send Text” action is a free-form message and only delivers inside the 24-hour window – use “Send Template” for anything that needs to reach someone outside it.
Can automation send a WhatsApp Flow?
Yes. “Send WhatsApp Flow” is one of the available actions, so a triggered automation can open an interactive form the same way a manual message would.
How does match percentage work in a keyword condition?
It controls how closely an inbound message has to match your keyword. 100% requires an exact match; lowering it to 90% or 80% allows for typos, extra words, or different phrasing while still triggering the condition.
Can I track how many times an automation has run?
Yes. The Automations list shows each workflow’s execution count and completion rate, and you can open the analytics view for more detail on any individual workflow.